JavaScript/jQuery Slideshow project
Task Guidelines
Using what you have learnt about JavaScript and jQuery you are to create a stand-alone image slideshow webpage.
This slideshow should display an image at a reasonable size, at least 350px by 200px, no bigger than 900px by 500px. It should contain "Next" and "Back" buttons to allow the user to cycle through this and at least four other images (five images in total). Each of the five images should be exactly the same dimensions.
Your slideshow is to be coded into an external JavaScript file named sideshow.js.
Your slideshow should also contain thumbnails (smaller versions of each of your images) which the user is able to click on to jump to a specific image immediately. These thumbnails should be no less than 50px by 20px and no more than 150px by 100px in size. Each thumbnail image should be exactly the same dimensions. You will need to use Photoshop to resize your images.
You can design this page to look any way you like but you must use CSS for the page layout and you must include a background image.
Project stages
- Create a new project folder to organise the work for this assignment. You will also need one subfolder inside this folder for images, one subfolder for CSS and another for JavaScript.
- Collect at least five images. These can be images you have sourced on the Internet or digital photographs you have taken (keep it clean). Add the correctly sized images to your images folder.

- Resize all of your images so they are the same size making sure that the size you choose is suitable for use on screen.
- Create a thumbnail image (much smaller version) of each image you will use, name it appropriately (i.e. include the word "thumbnail" in the image filename) and add these to your images folder.
- Design how your page will look either on paper or in a graphics application. Make sure you are clear on the title of the page, the position of the image being displayed, the position of the thumbnails and the position of the "Back" and "Next" buttons.
- Create any graphics you will need for your project. Maybe you will need button graphics for the "Next" and "Back" buttons?
- Create a new XHTML page containing a <h1> tag for your page's title and areas for your main image, your thumbnails and your buttons. You may also add some text which could inform the user how to use your page.
- Create a new CSS document slideshow.css, save it in your CSS folder and link it to your XHTML page.
- Create a new JavaScript document slideshow.js, save it in your JavaScript folder and link it to your XHTML page.
- Add in the content to your XHTML page. This will include the thumbnail images, the buttons, the main image and any text you wish to include.
- Code the CSS layout for your page into the slideshow.css file.

- You now need to begin adding the JavaScript. An image preloader will help you with this project as you will need your images loaded and ready before they are called by a button click. Here is a tutorial which will walk you through implementing your own preloader.
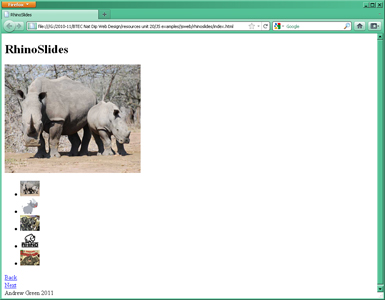
- Create an array and assign it the paths to each of the images you include, in the case of Rhinoslides this looked like this:
var imageList = new Array("rhino1.jpg","rhino2.jpg", "rhino3.jpg","rhino4.jpg","rhino5.jpg"); - Add a new variable definition to your slideshow.js file, use this to keep track of which image is presently displayed using the array index of that image (0-4). Assign this variable the array position of the image you have added to your HTML page (usually this will be 0).
- Create a function to change the presently displayed image. You may use jQuery's $('nameofimage'), getElementById() or any other aspect of JavaScript which will allow you to achieve this. Your function should accept one argument, the array index of the image you wish to change to.
- Create two functions to allow the user to move through the slideshow by manipulating the variable in which you keep track of which image is loaded and by calling the function created in the last step. Add event handlers to the HTML 'next' and 'back' controls to activate these functions.
- Add event handlers to the HTML thumbnail image controls which, when clicked, trigger the image change function and load the respective full size image.
- Improve the way your slideshow moves from slide to slide with jQuery transitions.